Wi-Fi ESP-32 Humidity and Temperature Module
Abstract
In my free time, I like to explore other fields related to engineering. While scrolling on AliExpress, I saw a cheap ESP32 dev kit, which included an OLED (128x64) display and a DHT11 temperature and humidity sensor. I decided to make a small project to know which tech stack is needed to develop and deploy small DIY projects on this MC. The whole codebase is available in this GitHub repository.
This blog entry serves as a tutorial, where I try to explain all my code and steps, as well as my thoughts on the process of building this.
Introduction
One core course for the “Biomedical Engineering” branch of my university was “Automatic Control” where we explored machine control theory and its applications. The course had a heavy theoretical part, where we would have to analyze dynamic systems to find the stability points (known as zeros and poles), and design a PID controller to match the reference input value. Although this course had a major impact on many people in my degree (either by frightening or by charming them), it had almost no effect on me, since I did not really have any interest in industrial automatization. However, some years later, I learned about how many of these things where used in robotics, or at least how the “mentality” (or soft skills) that I learned where transcribed into this other field. My flatmate, however, had a real interest in Control Theory and MC (so much that he did his final B.Sc. thesis on the matter, you can check it out here), therefore, being the susceptible human that I am, I became interested too.
As an amateur that I am, I only know 3 possible technologies in which you can “embed a program” and integrate them in an electrical circuit (with sensors and actuators), these are: (i) Arduino; (ii) ESP32; (iii) Raspberry Pi. The Arduino boards are the easiest to get your way around while being a newbie, however, they are missing the internet antenna that makes (for me) this project interesting. The Raspberry Pi has always been presented to me as a “little computer”, in which you can install a Linux kernel or distro and communicate using the SSH protocol from your main PC, so it is an overkill for little projects like this. The ESP32 however seems like a good place to start, considering my low-level programming skills are sufficient.
While maintaining the best programming practices, this little project is aimed at understanding how to display data in an OLED using the I2C protocol, how to read data from a sensor through an input pin of the ESP32, and how to connect and send JSON information using the ESP32 WiFi functionality to my computer.
Materials
Everything used in this project can be found in the ESP32 Development Kit linked. The software used for programming is PlatformIO, which is a VSCode extension, you can find useful guides on PlatformIO here.
Methods
Breadboard
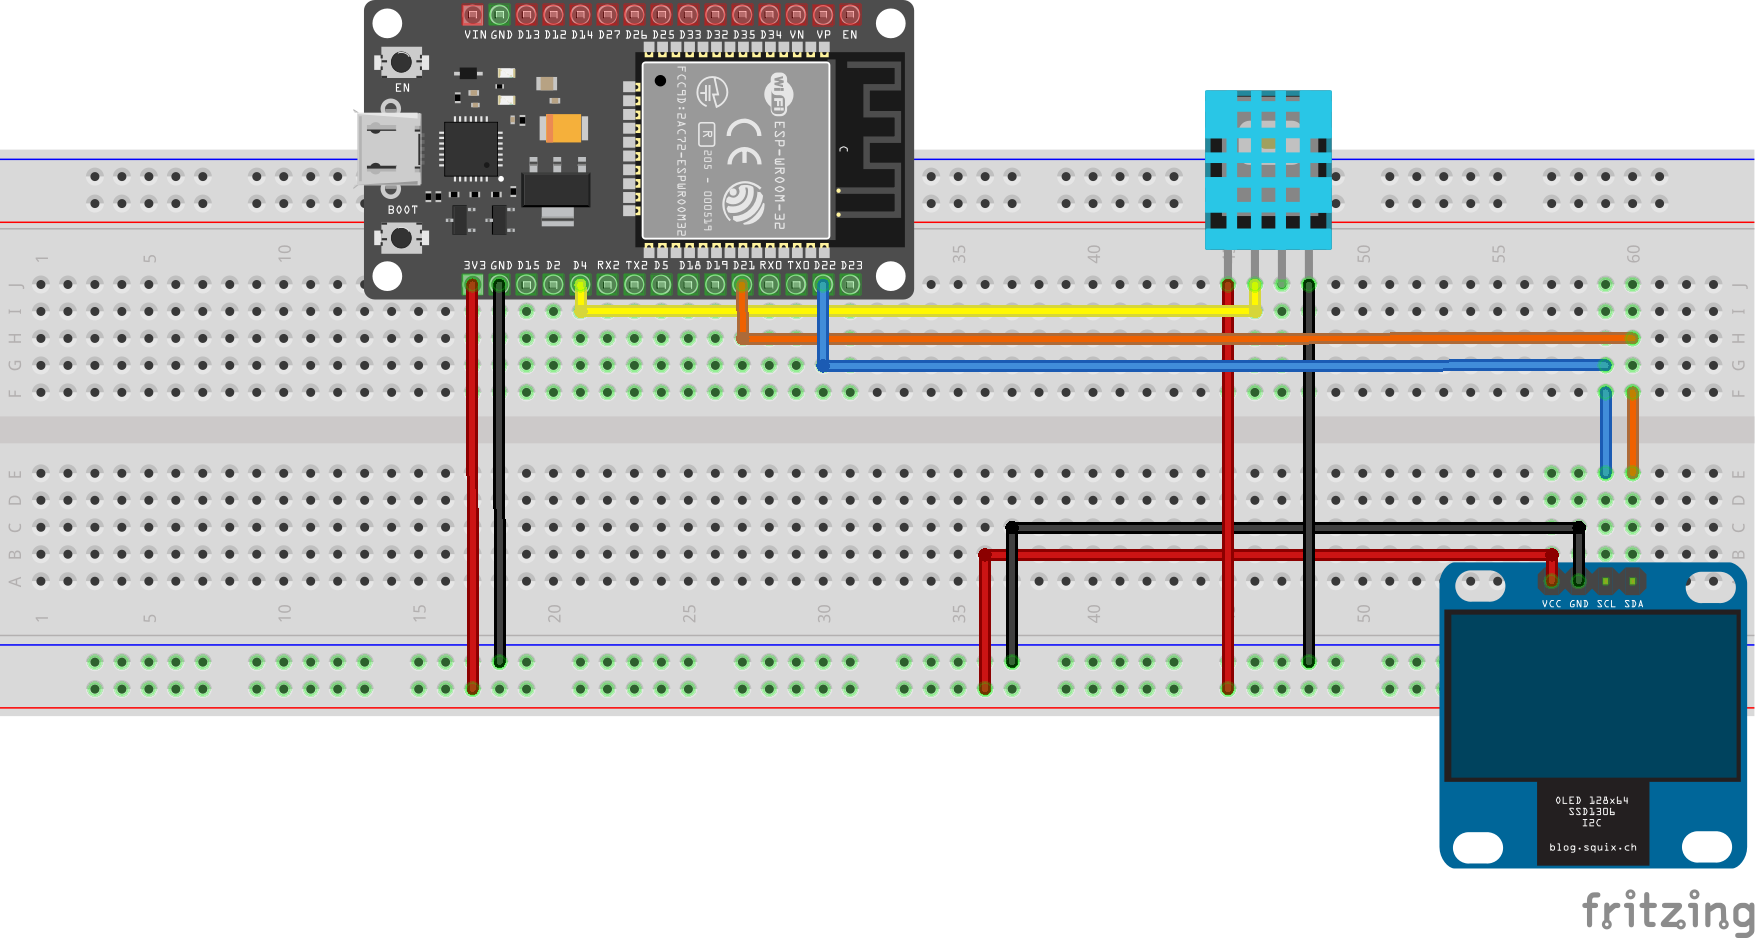
Fig 1 shows the circuit schematic used for this project. I tried to tidy it up it as much as possible, so there are some useless jumping wires here and there. The important part of the schematic is the pin allocation for each component of the circuit. We will be using PINs 21 and 22 for I2C communication with the OLED, where the pin 21 will be used for data transfer (SDA) and the pin 22 for clock signal (SCL). For I/O communication with the DHT11 sensor you can use either PIN 4 or 5. Fig 1 shows PIN 4, but in the end I used PIN 5, just make sure to change it in the code.
Configuration
There are some constant values that are important to identify and communicate with our components. I decided to declare and define all these constant values in a separate file, where I can really keep track of their setting. The following code corresponds to config.h, the header file of the configuration module.
#pragma once
#include <Arduino.h>
namespace cfg {
    // GPIOs
    constexpr gpio_num_t PIN_DHT      = GPIO_NUM_5;
    constexpr uint8_t    I2C_SDA      = 21;
    constexpr uint8_t    I2C_SCL      = 22;
    // I2C display
    constexpr uint8_t    OLED_ADDR    = 0x3C; // OLED I2C address, I decided to declare it
    constexpr uint16_t   OLED_W       = 128;
    constexpr uint16_t   OLED_H       = 64;
    // Task timing
    constexpr TickType_t SENSOR_PERIOD = pdMS_TO_TICKS(2000); // DHT11 max 0.5 Hz
    constexpr TickType_t UI_PERIOD     = pdMS_TO_TICKS(500);  // smoother refresh
    // From now on, WiFi credentials, defined in config.cpp
    // WiFi credentials
    extern const char* WIFI_SSID;
    extern const char* WIFI_PASS;
    // Server endpoint
    extern const char* SERVER_URL;
    // I decided to send the data in batchs to avoid network saturation
    constexpr size_t READINGS_PER_BATCH = 10;
    constexpr size_t NETWORK_QUEUE_SIZE = 5;
} // namespace cfg
The config.cpp file only implements the actual WiFi passwords and values.
#include "config.h"

namespace cfg {
    // WiFi credentials
    const char* WIFI_SSID = "(wifi SSID)";
    const char* WIFI_PASS = "(password)";

    // Server endpoint
    const char* SERVER_URL = "http://(your computer IP):8080/sensor-data";
}
Display
The display module is simple, we only need an init() method that returns the OLED status and initializes it with the previously defined constants, one helper method to center our text in the OLED, and one function per display we want to show. The first two methods are straightforward:
#include "display.h"
#include <esp_log.h>

static const char* TAG = "DISPLAY";

Display::Display(Adafruit_SSD1306& oled_ref) : oled(oled_ref) {}

bool Display::init() {
    if (!oled.begin(SSD1306_SWITCHCAPVCC, cfg::OLED_ADDR)) {
        ESP_LOGE(TAG, "SSD1306 init failed");
        return false;
    }

    oled.clearDisplay();
    oled.setTextColor(SSD1306_WHITE);
    oled.setTextSize(1);
    centrePrint(0, F("Environmental + WiFi"));
    oled.display();

    ESP_LOGI(TAG, "Display initialized successfully");
    return true;
}

void Display::centrePrint(int16_t y, const String& txt) {
    int16_t x1, y1;
    uint16_t w, h;
    oled.getTextBounds(txt.c_str(), 0, 0, &x1, &y1, &w, &h);
    int16_t x = (cfg::OLED_W - w) / 2;
    oled.setCursor(x, y);
    oled.print(txt);
}
As a sanity routine, every time the OLED gets initialized, we clear the display, set our text color, font size, display a static message (“Environmental + WiFi”), and return a positive boolean if the routine ended successfully. The Display::centrePrint method gets the text length, stores the width of the text in w, and computes the offset (int16_t x) that it needs to set so that the text appears in the middle of the display. The display height is hard-coded by the input parameter y.
Only two more functions are needed to complete this module, which are: (i) Display::showWiFiStatus, to display the WiFi status regarding the connection between the ESP32 and my router, and (ii) Display::showSensorData, which displays temperature (T), humidity (RH), WiFi status, and the buffer that is being stored relative to the hard-coded readings per batch (10). Only the stored buffer reaches the maximum readings per batch, the network module parses the data into a JSON file to sent it to a python script listening on the target port.
void Display::showWiFiStatus(const String& status) {
    oled.fillRect(0, 16, cfg::OLED_W, 32, SSD1306_BLACK);
    centrePrint(24, "WiFi: " + status);
    oled.display();
}

void Display::showSensorData(const Reading& reading, size_t buffer_count, bool wifi_connected) {
    oled.fillRect(0, 16, cfg::OLED_W, 48, SSD1306_BLACK);

    if (isnan(reading.t) || isnan(reading.h)) {
        centrePrint(32, F("Sensor error"));
    } else {
        centrePrint(20, "T = " + String(reading.t, 1) + " C");
        centrePrint(32, "RH = " + String(reading.h, 0) + " %");

        // Show WiFi status and buffer count
        String status = "WiFi: " + String(wifi_connected ? "OK" : "X") +
                       " Buf: " + String(buffer_count) + "/" + String(cfg::READINGS_PER_BATCH);
        centrePrint(44, status);
    }
    oled.display();
}
Sensor
The main class is SensorManager, which owns the DHT sensor driver and holds the last successful reading, while protecting it with a FreeRTOS mutex. The constructor initializes the class with the settings defined in config.h. First, it configures the DHT pin as INPUT_PULLUP and waits briefly, afterwards, it starts the DHT driver and waits for sensor stabilization, creating a FreeRTOS mutex (xSemaphoreCreateMutex) to guard the current reading. Finally, it returns true on success, and false if the mutex couldn’t be created.
#include "sensor.h"
#include "config/config.h"
#include <esp_log.h>

static const char* TAG = "SENSOR";

SensorManager::SensorManager() : dht(cfg::PIN_DHT, DHT11), reading_mutex(nullptr) {}

SensorManager::~SensorManager() {
    if (reading_mutex) {
        vSemaphoreDelete(reading_mutex);
    }
}

bool SensorManager::init() {
    // GPIO setup
    pinMode(cfg::PIN_DHT, INPUT_PULLUP);
    delay(1000);

    // Initialize DHT sensor
    ESP_LOGI(TAG, "Initializing DHT sensor...");
    dht.begin();
    delay(2000);

    // Create mutex
    reading_mutex = xSemaphoreCreateMutex();
    if (!reading_mutex) {
        ESP_LOGE(TAG, "Failed to create reading mutex");
        return false;
    }

    ESP_LOGI(TAG, "Sensor manager initialized");
    return true;
}
The only two more functionalities that we may need from the sensor class is the safe SensorManager::getCurrentReading and the actual reading function, SensorManager::readSensor. The current reading function locks the mutex, copies the most recent cached current reading into a local Reading variable, unlocks, and returns the copy. To take a new reading, the function asks the DHT driver for fresh temperature and humidity events: dht.temperature().getEvent(...) and dht.humidity().getEvent(...), validating both by checking they’re not NaN. On success, it populates the output reference with temperature (ºC), humidity (%RH), and timestamp = millis() to get the time of the reading. It updates the cached current_reading under the mutex, logs the values and returns true.
Reading SensorManager::getCurrentReading() {
    Reading reading;

    if (reading_mutex) {
        xSemaphoreTake(reading_mutex, portMAX_DELAY);
        reading = current_reading;
        xSemaphoreGive(reading_mutex);
    }

    return reading;
}

bool SensorManager::readSensor(Reading& reading) {
    sensors_event_t evT, evH;

    ESP_LOGD(TAG, "Attempting to read DHT sensor...");

    dht.temperature().getEvent(&evT);
    dht.humidity().getEvent(&evH);

    bool temp_valid = !isnan(evT.temperature);
    bool hum_valid = !isnan(evH.relative_humidity);

    if (temp_valid && hum_valid) {
        reading.t = evT.temperature;
        reading.h = evH.relative_humidity;
        reading.timestamp = millis();

        // Update current reading
        if (reading_mutex) {
            xSemaphoreTake(reading_mutex, portMAX_DELAY);
            current_reading = reading;
            xSemaphoreGive(reading_mutex);
        }

        ESP_LOGI(TAG, "Sensor reading: %.1f °C, %.0f %%RH", reading.t, reading.h);
        return true;
    } else {
        ESP_LOGW(TAG, "Invalid sensor reading - temp_valid: %d, hum_valid: %d", temp_valid, hum_valid);
        return false;
    }
}
Network
The main class is NetworkManager, which owns a FreeRTOS queue to buffer outgoing batches of sensor readings and provides Wi‑Fi connectivity plus HTTP upload. The constructor sets up internal state; initialization creates the queue. Wi‑Fi is established via NetworkManager::connectWiFi, which performs a bounded retry loop with logging. Utility getters expose connection status and local IP.
#include "network.h"
#include "config/config.h"
#include <esp_log.h>

static const char* TAG = "NETWORK";

NetworkManager::NetworkManager() : batch_queue(nullptr) {}

NetworkManager::~NetworkManager() {
    if (batch_queue) {
        vQueueDelete(batch_queue);
    }
}

bool NetworkManager::init() {
    batch_queue = xQueueCreate(cfg::NETWORK_QUEUE_SIZE, sizeof(ReadingBatch*));
    if (!batch_queue) {
        ESP_LOGE(TAG, "Failed to create network queue");
        return false;
    }

    ESP_LOGI(TAG, "Network manager initialized");
    return true;
}

bool NetworkManager::connectWiFi() {
    // Disconnect any existing connection
    WiFi.disconnect(true);
    delay(1000);

    ESP_LOGI(TAG, "Starting WiFi connection...");
    ESP_LOGI(TAG, "SSID: %s", cfg::WIFI_SSID);
    ESP_LOGI(TAG, "Password length: %d", strlen(cfg::WIFI_PASS));

    WiFi.mode(WIFI_STA);
    WiFi.begin(cfg::WIFI_SSID, cfg::WIFI_PASS);
    ESP_LOGI(TAG, "Connecting to WiFi...");

    int attempts = 0;
    const int max_attempts = 40; // Increased to 20 seconds

    while (WiFi.status() != WL_CONNECTED && attempts < max_attempts) {
        delay(500);
        attempts++;

        // Show connection status every 5 attempts
        if (attempts % 5 == 0) {
            ESP_LOGI(TAG, "WiFi connection attempt %d/%d, Status: %d",
                     attempts, max_attempts, WiFi.status());
        }

        // Try to reconnect every 10 attempts
        if (attempts % 10 == 0 && attempts < max_attempts) {
            ESP_LOGI(TAG, "Retrying WiFi connection...");
            WiFi.disconnect();
            delay(1000);
            WiFi.begin(cfg::WIFI_SSID, cfg::WIFI_PASS);
        }
    }

    if (WiFi.status() == WL_CONNECTED) {
        ESP_LOGI(TAG, "WiFi connected successfully!");
        ESP_LOGI(TAG, "IP address: %s", WiFi.localIP().toString().c_str());
        ESP_LOGI(TAG, "Gateway: %s", WiFi.gatewayIP().toString().c_str());
        ESP_LOGI(TAG, "Subnet: %s", WiFi.subnetMask().toString().c_str());
        ESP_LOGI(TAG, "DNS: %s", WiFi.dnsIP().toString().c_str());
        ESP_LOGI(TAG, "RSSI: %d dBm", WiFi.RSSI());
        return true;
    } else {
        ESP_LOGE(TAG, "WiFi connection failed after %d attempts", attempts);
        ESP_LOGE(TAG, "Final WiFi status: %d", WiFi.status());

        // Print status explanation
        switch(WiFi.status()) {
            case WL_NO_SSID_AVAIL:
                ESP_LOGE(TAG, "SSID not found - check network name");
                break;
            case WL_CONNECT_FAILED:
                ESP_LOGE(TAG, "Connection failed - check password");
                break;
            case WL_CONNECTION_LOST:
                ESP_LOGE(TAG, "Connection lost");
                break;
            case WL_DISCONNECTED:
                ESP_LOGE(TAG, "Disconnected");
                break;
            default:
                ESP_LOGE(TAG, "Unknown WiFi error");
                break;
        }
        return false;
    }
}

bool NetworkManager::isConnected() const {
    return WiFi.status() == WL_CONNECTED;
}

String NetworkManager::getLocalIP() const {
    return WiFi.localIP().toString();
}
The remaining functionality covers batching and sending data plus a task loop. NetworkManager::queueBatch copies a ReadingBatch to heap and enqueues its pointer; NetworkManager::sendDataBatch serializes readings to JSON and POSTs to cfg::SERVER_URL; NetworkManager::networkTask drains the queue and sends, cleaning up memory.
bool NetworkManager::queueBatch(const ReadingBatch& batch) {
    if (!batch_queue) return false;

    // Allocate memory for the batch copy
    ReadingBatch* batch_copy = new ReadingBatch(batch);

    if (xQueueSend(batch_queue, &batch_copy, 0) == pdTRUE) {
        ESP_LOGI(TAG, "Batch queued for sending (%d readings)", batch.size());
        return true;
    } else {
        delete batch_copy;
        ESP_LOGW(TAG, "Network queue full, dropping batch");
        return false;
    }
}

bool NetworkManager::sendDataBatch(const ReadingBatch& readings) {
    if (!isConnected()) {
        ESP_LOGW(TAG, "WiFi not connected, cannot send data");
        return false;
    }

    HTTPClient http;
    if (!http.begin(cfg::SERVER_URL)) {
        ESP_LOGE(TAG, "Failed to begin HTTP connection");
        return false;
    }

    http.addHeader("Content-Type", "application/json");

    // Create JSON payload
    JsonDocument doc;
    doc["device_id"] = "ESP32_DHT11";
    doc["batch_time"] = millis();
    doc["readings"].to<JsonArray>();

    for (const auto& reading : readings) {
        JsonObject obj = doc["readings"].add<JsonObject>();
        obj["temperature"] = reading.t;
        obj["humidity"] = reading.h;
        obj["timestamp"] = reading.timestamp;
    }

    String jsonString;
    serializeJson(doc, jsonString);

    ESP_LOGI(TAG, "Sending batch of %d readings", readings.size());
    ESP_LOGD(TAG, "JSON payload: %s", jsonString.c_str());

    int httpResponseCode = http.POST(jsonString);

    bool success = (httpResponseCode >= 200 && httpResponseCode < 300);

    if (success) {
        String response = http.getString();
        ESP_LOGI(TAG, "HTTP Response: %d - %s", httpResponseCode, response.c_str());
    } else {
        ESP_LOGE(TAG, "HTTP POST failed: %d", httpResponseCode);
    }

    http.end();
    return success;
}

void NetworkManager::networkTask() {
    ReadingBatch* batch;

    for (;;) {
        if (xQueueReceive(batch_queue, &batch, portMAX_DELAY) == pdTRUE) {
            ESP_LOGI(TAG, "Processing batch from queue");

            bool success = sendDataBatch(*batch);
            if (success) {
                ESP_LOGI(TAG, "Batch sent successfully");
            } else {
                ESP_LOGW(TAG, "Failed to send batch");
                // Could implement retry logic here
            }

            delete batch; // Clean up allocated memory
        }
    }
}
As a side note, this was the most stressful module to code and debug, in the end it was because the deprecation of StaticJsonDocument, and me not knowing how to work with the JsonDocument type. There may be a lot of code here, but it narrows down to logging, data collection, and data transmision via an HTML POST operation (http.POST(jsonString)). Further experimentation with possible HTML errors would be good.
Wrapper: Tasks Module
After looking at several ESP32 projects on the internet, I noticed that most of them coded their components-related modules, and then integrated the functionality is a “tasks” module, where they would just orchestrate the functionality of the component with high-level functions they can use from their main.cpp script. Here, the main class is TaskManager, which coordinates sensor sampling, batching/uploads, and UI updates. It holds references to SensorManager, NetworkManager, and Display. It also maintains a readings buffer. During initialization, it creates the buffer mutex, logs status with ESP-IDF, and returns true on success (false if the mutex cannot be created).
// filepath: tasks.cpp
#include "tasks.h"
#include "config/config.h"
#include <esp_log.h>

static const char* TAG = "TASKS";

TaskManager::TaskManager(SensorManager& sensor, NetworkManager& network, Display& disp)
    : sensor_manager(sensor), network_manager(network), display(disp), buffer_mutex(nullptr) {}

TaskManager::~TaskManager() {
    if (buffer_mutex) {
        vSemaphoreDelete(buffer_mutex);
    }
}

bool TaskManager::init() {
    buffer_mutex = xSemaphoreCreateMutex();
    if (!buffer_mutex) {
        ESP_LOGE(TAG, "Failed to create buffer mutex");
        return false;
    }

    ESP_LOGI(TAG, "Task manager initialized");
    return true;
}
The two core task loops are the safe TaskManager::sensorTask and the UI updater TaskManager::uiTask. The sensor task periodically calls sensor_manager.readSensor; on success, it pushes the reading into the guarded buffer and, when the buffer reaches cfg::READINGS_PER_BATCH, it copies the buffer into a batch and tries to enqueue it via network_manager.queueBatch. If enqueued, it clears the buffer; otherwise it keeps data for later retries. The UI task polls the latest cached reading with sensor_manager.getCurrentReading, snapshots the buffer size under the mutex, and renders via display.showSensorData. Both tasks sleep using vTaskDelay with periods from config.h.
// filepath: tasks.cpp
void TaskManager::sensorTask() {
    Reading reading;

    for (;;) {
        if (sensor_manager.readSensor(reading)) {
            // Add to buffer for batch sending
            xSemaphoreTake(buffer_mutex, portMAX_DELAY);
            readings_buffer.push_back(reading);

            // Check if we have enough readings to send
            if (readings_buffer.size() >= cfg::READINGS_PER_BATCH) {
                ReadingBatch batch = readings_buffer;   // copy

                // Try to send without clearing first (as per your request)
                bool ok = network_manager.queueBatch(batch);
                if (ok) {
                    readings_buffer.clear();
                    ESP_LOGI(TAG, "Batch queued successfully, buffer cleared");
                } else {
                    ESP_LOGW(TAG, "Failed to queue batch, keeping data in buffer");
                }
            }
            xSemaphoreGive(buffer_mutex);

            ESP_LOGI(TAG, "Sampled: %.1f °C  %.0f %%RH (Buffer: %d/%d)",
                     reading.t, reading.h, readings_buffer.size(), cfg::READINGS_PER_BATCH);
        }

        vTaskDelay(cfg::SENSOR_PERIOD);
    }
}

void TaskManager::uiTask() {
    for (;;) {
        Reading r = sensor_manager.getCurrentReading();
        size_t buffer_count;

        xSemaphoreTake(buffer_mutex, portMAX_DELAY);
        buffer_count = readings_buffer.size();
        xSemaphoreGive(buffer_mutex);

        display.showSensorData(r, buffer_count, network_manager.isConnected());

        vTaskDelay(cfg::UI_PERIOD);
    }
}
Main script
The setup() method of the main script instantiates all the classes with the parameters defined in the configuration class, performs the sensor initialization routine, WiFi connection routine, and uploads the tasks for the loop() function. It also includes important debugging steps using the </code><esp_log.h></code> library, or at least, logging points that I found important while debugging the code, and that cause no harm to be left behind.
#include <Arduino.h>
#include <Wire.h>
#include <esp_log.h>
#include <Adafruit_GFX.h>
#include <Adafruit_SSD1306.h>

// Local modules
#include "config/config.h"
#include "types/types.h"
#include "display/display.h"
#include "sensor/sensor.h"
#include "network/network.h"
#include "tasks/tasks.h"

// ───────────────────────────── Module instances ─────────────────────────────
static const char *TAG = "APP";

static TwoWire I2CBus = TwoWire(0);  // dedicated bus instance
static Adafruit_SSD1306 oled(cfg::OLED_W, cfg::OLED_H, &I2CBus, -1);

static Display display(oled);
static SensorManager sensor_manager;
static NetworkManager network_manager;
static TaskManager task_manager(sensor_manager, network_manager, display);

void setup()
{
    // Serial & logging
    Serial.begin(115200);
    esp_log_level_set("*", ESP_LOG_INFO);

    ESP_LOGI(TAG, "=== ESP32 Environmental Monitor Starting ===");

    // I²C
    I2CBus.begin(cfg::I2C_SDA, cfg::I2C_SCL, 400000);

    // Display initialization
    if (!display.init()) {
        fatal("Display initialization failed");
    }

    // Show WiFi connection status on display
    display.showWiFiStatus("Connecting...");

    // Network initialization
    if (!network_manager.init()) {
        fatal("Network manager initialization failed");
    }

    // WiFi connection with display feedback
    bool wifi_connected = network_manager.connectWiFi();
    if (wifi_connected) {
        display.showWiFiStatus("Connected: " + network_manager.getLocalIP());
        delay(2000); // Show IP for 2 seconds
    } else {
        display.showWiFiStatus("Failed");
        delay(2000);
    }

    // Sensor initialization
    if (!sensor_manager.init()) {
        fatal("Sensor manager initialization failed");
    }

    // Task manager initialization
    if (!task_manager.init()) {
        fatal("Task manager initialization failed");
    }

    ESP_LOGI(TAG, "Creating tasks...");

    // Create tasks
    xTaskCreatePinnedToCore(TaskManager::sensorTaskWrapper, "SensorTask", 8192, &task_manager, 1, nullptr, 1);
    xTaskCreatePinnedToCore(TaskManager::uiTaskWrapper, "UiTask", 4096, &task_manager, 1, nullptr, 1);
    xTaskCreatePinnedToCore(NetworkManager::networkTaskWrapper, "NetTask", 8192, &network_manager, 1, nullptr, 1);

    ESP_LOGI(TAG, "=== Initialization Complete ===");
}

void loop() {
    vTaskDelete(nullptr);
}
Python Listener
The Python listener is quite straightforward and could be implemented in many ways, in my case, I let the generative AI ChatGPT help me incorporate the data collection with a Matplotlib animation, where we can visualize in real time the temperature and humidity measurements and the temperature-humidity curve. The listener script should be initialized at a local computer IP (e.g., http://0.0.0.0:8080), using the same port and endpoint configuration implemented in the ESP32 config.h file. The data collection is straightforward, by creating a method do_POST(self) or do_GET(self) within a class that inherits from BaseHTTPRequestHandler we can obtain the latest JSON sent to the endpoint. In my case, I decided to go with a POST HTTP operation, this is the start of this class:
class SensorHandler(BaseHTTPRequestHandler):
    def do_POST(self):
        if self.path == '/sensor-data':
            content_length = int(self.headers['Content-Length'])
            post_data = self.rfile.read(content_length)

            try:
                data = json.loads(post_data.decode('utf-8'))
                ...
                # Data decoding and storing
    ...
...

def start_server():
    server = HTTPServer(('0.0.0.0', 8080), SensorHandler)
    print("Server running on http://0.0.0.0:8080")
    print("Waiting for sensor data...")
    server.serve_forever()
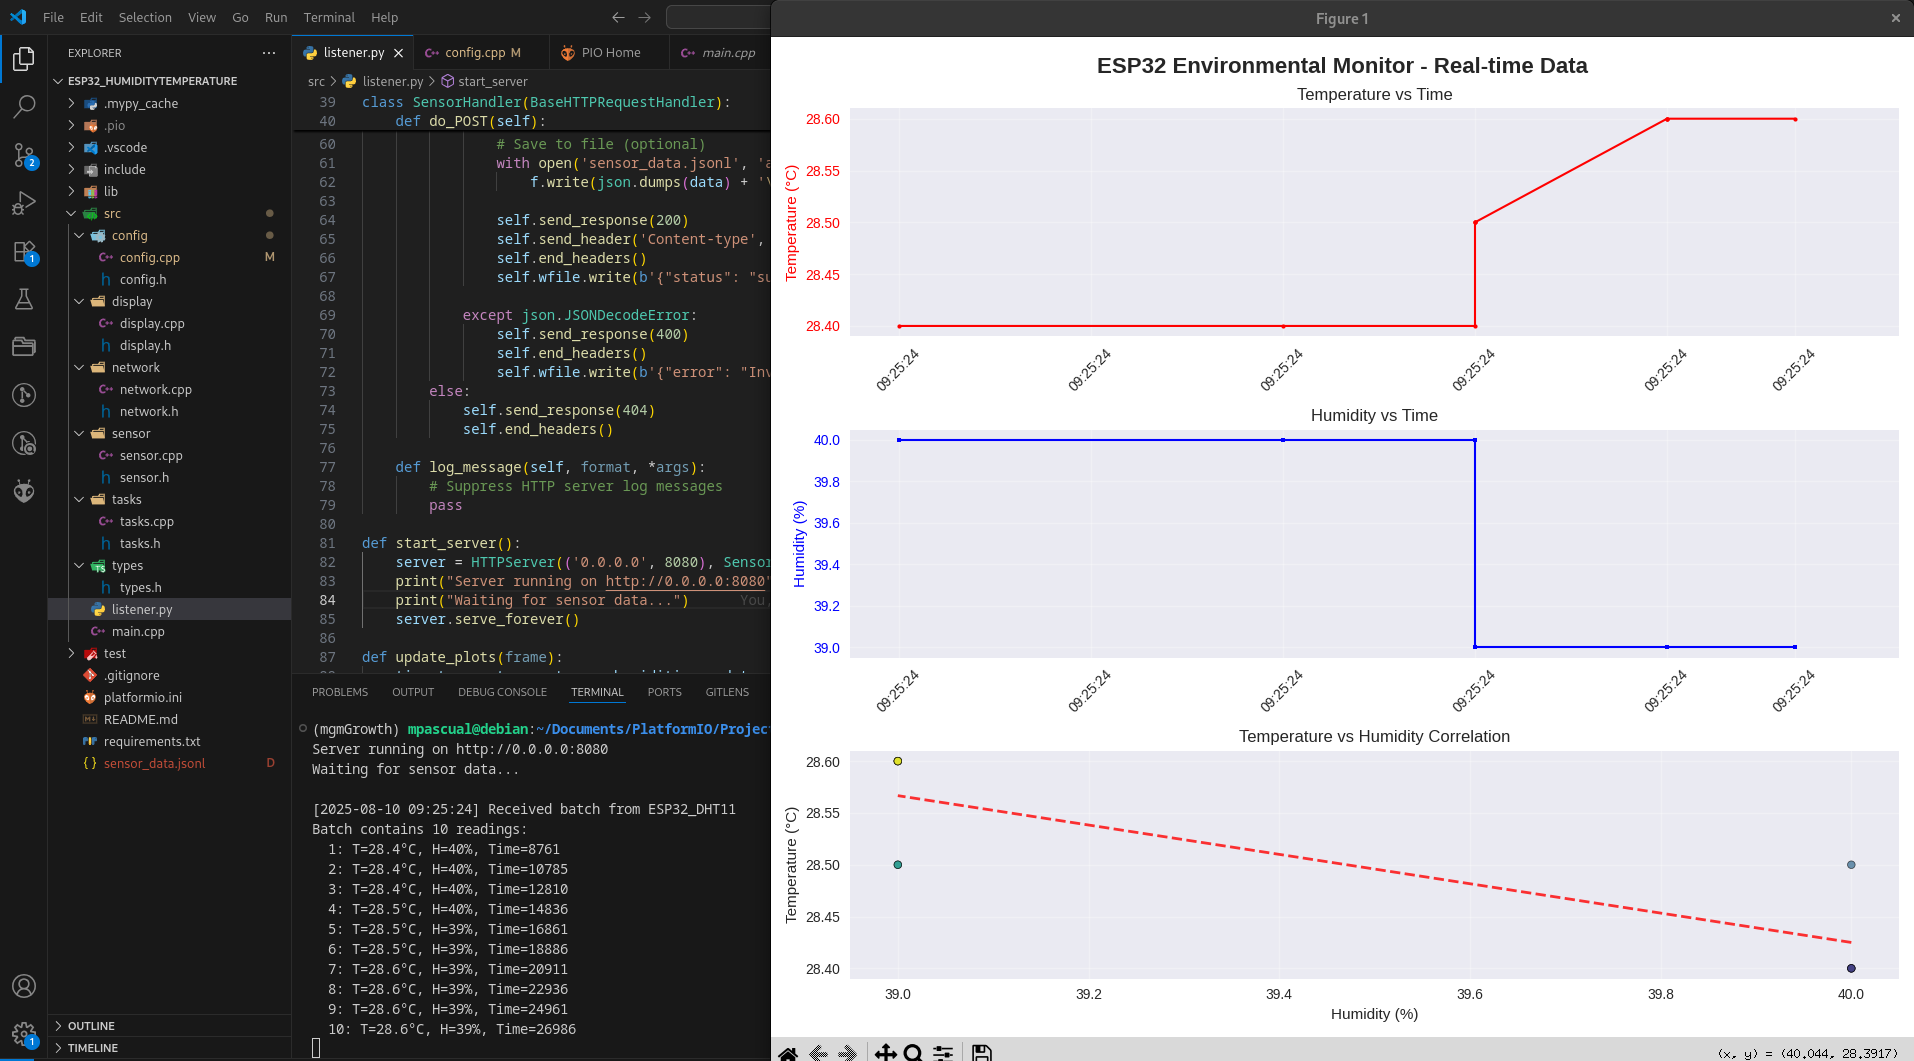
Fig 2 showcases the final in real-time plots generated by the listener script for the first batch of data collected by the sensor.
Final Thoughts
This year has been pretty stressful to me, as I have been lucky enough to work as a researcher for the first time in my life, and have known almost-real PhD-level suffering, such as reviewer’s deadlines, the constant urge to be working on something to publish, or the pursuit of excellence that has guided my life here in the first place. I was really looking forward to taking a break this summer, and spend some time for myself. This project, which is remotely far from my research area, has been a breath of fresh air for me, since I had the opportunity to remember what it was to learn something new and simple, and get a good satisfaction after a week of debugging and developing.
In the future, when I have a stable job and defined working hours, I intend to integrate all this knowledge that I’m getting from these little DIY projects to create a centralized intelligent assistant, that can send me weather alerts to my mobile phone, has a NAS server, etc.